Thursday, July 31, 2014

Getting Ready for Back to School!

It's summer time and if you are like me, that means it's time to start getting things ready for next year. I rather create and put together things on my own time rather than stressing about it the first week of school. With that being said, this blog post is the only school related thing I am doing today.

I move my kiddos seats around every month. If they stay in the same seat any longer it becomes a problem (talking/arguing too much with their neighbors). I needed primary name tags that I could move quickly and easily with my students. I decided to put name tags on my students' pencil boxes. The tags at the stores (even the smaller ones) were too big! That's when I created these primary name tags.


They come in different colors, have the alphabet, numbers to 20, flat and solid shapes, left and right direction labels, and spot to write students' names. When it is time to work in groups, change seats, and/or someone needs to go to time out, all my kiddos have to do is take their box with them. Now they have some valuable information with them at all times. The tags being on pencil boxes have made a world of difference in my very busy classroom.

I decided to update my behavior chart to include emotion clip art to help students identify what it means to be on each color. It is a great visual for all my students. I printed the pages onto cardstock and taped the pages together. Then, I laminated it at Lakeshore Learning (one of my favorite stores). I have left over clothes pins from Dollar Tree and will write my students' names on it. The pins will go on the "ready to learn" every morning and will move up for good behavior or down for not so good behavior.


My classroom number posters were in need of updating. Yes, they were colorful, had fun animals on them, and had some number correspondence but I needed more. I created a pack that showed numbers 1-20 using primary lines, written words, and the number shown in tens-frames, base ten rods, and tally marks. I love that my students will be able to see these everyday!


We are currently implementing Daily 5 in my school. With it being my first year at the school, my leveled books were not as organized as I would have liked. Don't get me wrong, all the "A" books were in the "A" bin. However, I am super organized and my students were not putting the books back in the correct bins when they shopped. We all have enough on our plate than to sit and go through all the books daily to ensure they are in their right spot.

I started to write the letter on the back on each book to indicate the level of the book. Sometimes I would cut up blank mailing address labels and use them too. This helped students (especially the in-between level readers) to put their books back in the correct bin. My next problem were the labels on my book bins. They looked sorry and needed updating. I made a pack of guided reading labels for your bins too. It made such a difference in my class.


The picture only shows 3 bins. I have several "A", "B", "C", and "D" bins that are all next to each other. I just grabbed these 3 when cleaning to show you a picture.


My Daily 5 time is an extra special time because my classroom becomes an inclusion classroom with a special education teacher coming in to work with us. I always have 5 centers or activities going on in the room. My classroom has different styles and sizes of tables which cause a problem for different size groups to work. So my centers are often in different locations depending on the activity and/or the number of students in the group. As you can imagine that is a lot to take on for a 5/6 year old. First, they need to remember what activity they are doing and where they are going to sit. If they forget, they have to remember who is in their group and find where they are sitting. If you think that is hard, remember group members are always being switched out due to the progress they are making. Now add a disability on top of that! Of course I created a solution.

https://docs.google.com/file/d/0B3Q6ehNfYhkbd0FZNkVubkRuRzA/edit


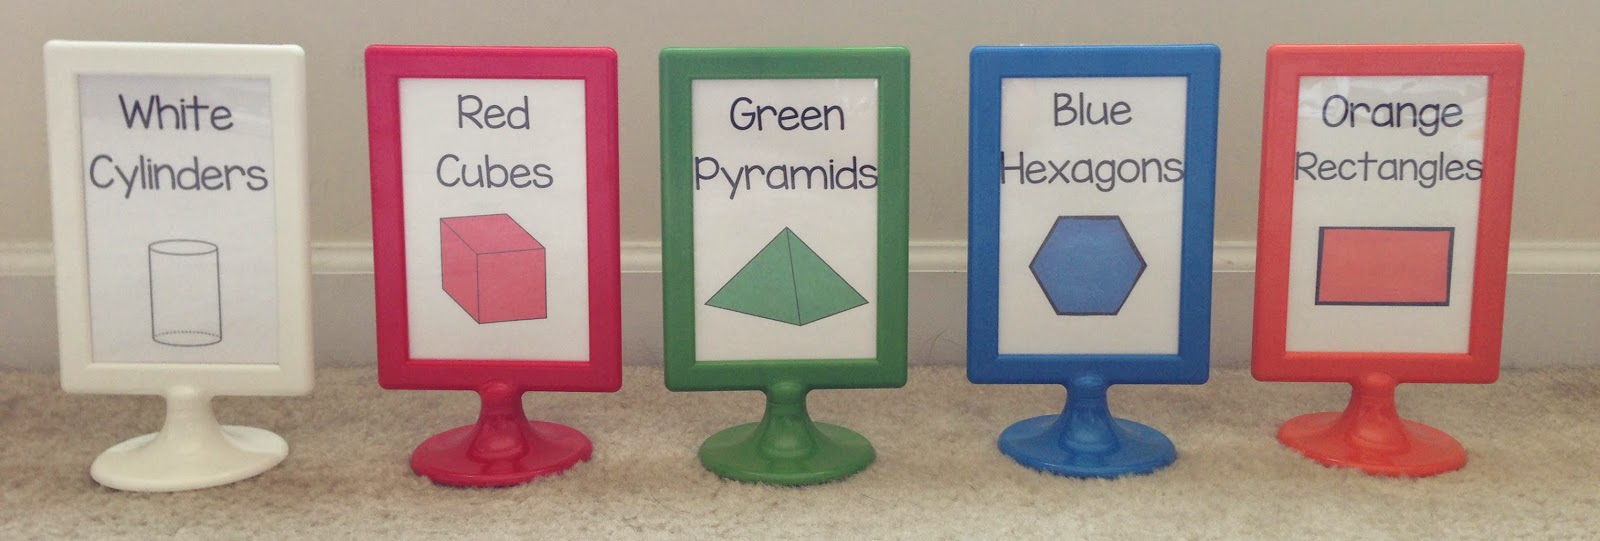
These are my new signs for my centers. I saw something similar on Pinterest and dragged my husband to IKEA (they were only $0.99 each). That poor man is dragged to all these stores! So I couldn't just make signs that said "word work " because they may be working on more than just word work. I decided that each group will be called a color. I couldn't stop there. I had to add a shape to give that group a name, and the shape had to be one that students usually have trouble with. Now my kiddos will be reviewing their shapes and colors during Daily 5! They are super cute too. Click on the picture for your own copy. Make sure to print out two copies of each page so your frames have a back and front. I added a second white one to save paper.


Wednesday, June 25, 2014

Word Wall

Everyone does their word wall a little differently. I seem to move mine around every year. This past year I put my word wall on the cabinet doors where my students put their backpacks. This put all the words at their eye level. This helped with my word work during centers. I used it as a teaching tool prior to packing up for the day too. Using words on multi-colored paper was to much for my students. I have since printed the words onto white cardstock. However, I did leave students' names colorful.


In the past I have taught my students Dolch Pre-Primer and Primer sight words. This past year my district switched to Reading 3D program using guided reading and Daily 5. I have already made sight words for my new word wall. Click on the picture below to see it. I am also working on a pack for number and colored words too. 


http://www.teacherspayteachers.com/Product/Kindergarten-Word-Wall-1291986


Sunday, June 22, 2014

Subtraction

I am finally getting around to sharing my subtraction unit. I was not very happy with the lessons in the math workbooks. They led up to subtraction without actually discussing it. I searched my favorite blogs and loved Mrs. Ricca's Kindergarten subtraction lessons. Here is a second link to read more: Fun with Subtraction.

My class read Five Green and Speckled Frogs by Constanza Basaluzzo and we had to sing the song too. We ended up singing this song all day! Afterwards, we used frog pictures and as a class we created subtraction problems on the board. I do not have any pictures of this lesson. Click here for the pictures I used.


Next, we read Who Stole the Cookies from the Cookie Jar by Margaret Wang. Using Cookie Crisp cereal, my students created their own subtraction problems. The activity was a big hit! My kiddos loved it! However, there was some concern that the cereal did not taste like their mother's cookies.

 
The third day we read Five Little Monkeys Jumping on the Bed by Eileen Christelow. We used puppets and as a class wrote some subtraction problems. My kiddos went back to their seats and started creating their own subtraction problem that would later become part of a class book. The book was inspired by Mrs. Ricca's Kindergarten class book Five Little Monkeys Sitting in a Tree. Click here for my version.


Finally, we read Monster Musical Chairs by Stuart J. Murphy. Then we played musical chairs while writing subtraction problems on the board. The game was such a hit that we ended up playing it during rainy day recesses.
 
 
I created a subtraction pack to help supplement what was missing from our math curriculum. It contains guided subtraction problems, subtraction problems with pictures, practice subtraction problems, story problems, and color by number using subtraction pages. It was a big help to use in my classroom and I hope it help you too. Click on the picture to follow the link.
 
http://www.teacherspayteachers.com/Product/Subtraction-Practice-Pack-1287487


Tuesday, June 17, 2014

Eggs to Chicks in the Classroom

Getting the classroom and kiddos ready for our chicks has been fun. We have an egg calendar where we put up facts about the egg each day. Also, we have a countdown until the chicks arrive.


The picture below is the incubator with our chick eggs inside. They were smaller than I expected. They have dirt on them and my kiddos were concerned that someone wrote all over them. So cute!

 
The typical incubation period for chicken eggs is 21 days. Our chicks came a day early! We kept the chicks in the incubator for 2 days to let the other chicks hatch too. It is ok to leave the chicks in the incubator for 2 days because they still have the yolk from the egg in their bellies to keep them feeling full.


The chicks who hatched helped those still trying to hatch! When they were not stepping on other eggs, they used their beaks to help crack the eggs open. I recorded it with my iPad and used my Apple TV to stream it. The children loved it!
 
 
All but one of my eggs hatched. Prior to hatching, I discussed to the children that there is a good chance some of our eggs will not be fertilized. Unfortunately, our last one was fertilized but the chick was not strong enough to hatch. A chick hatching pro (another kindergarten teacher) said to leave those chicks to try it on their own. She said usually the ones that struggle do not live very long. She set up a rehabilitation center "a box" for those chicks that hatched and had problems. One chick went into the box because it could not move its legs. It was very hard for the children to see. The chick lived for 2 days.
 
Next we moved the chicks into a box with a lamp to keep them warm. I added 2 small stuffed animals into the box and the chicks cuddled up to them instantly. The first picture is the box in my room. Our chick expert, Ms. Rumph, box is below. I will make my box like hers next year.


I bought a kiddie pool at Walmart for $9.99 and let the chicks run around while I cleaned their box. During this time the children were allowed to watch. They were fascinated by their feces! I recommend putting newspaper down in the kiddie pool. It makes clean up much easier. They really do go a lot.


After 2 weeks it was time to go back to the farm. The chicks were starting to get their feathers and flying out of the pool onto the carpet. It was a great experience and I look forward to doing it again next year.


Friday, April 18, 2014

Life Cycle of a Chicken

This week we are on a much needed spring break. When we return to school on Monday we will begin a life cycle unit on chickens. Another kindergarten teacher travels to Charleston, SC to spend time with her family. Every year she returns from spring break with eggs to put in our incubators. I am very excited and nervous about it. I am worried that when the chicks hatch I will lose my kiddos. The next 20 or so days of school will be prepping them for that moment.

Luckily I inherited an incubator from the last teacher. She had two because she hatched ducks! I would love to do that at some point in my life. Right now I am good with my kiddos and chicks. Did I mention that I have a dog with anxiety at home? So I gave one of the incubators to another kindergarten teacher who did not have one. We were blessed to have our PTA purchase them a year or two ago.


So I created a life cycle of a chicken pack on Teachers Pay Teachers. This pack is to go along with your books about chicks. It contains 2 posters, can, have, are chart, KWL chart, observation book, sight word book, vocabulary cards, student worksheets, procedural writing, word work, labeling a chicken, and a Venn Diagram sheet.


http://www.teacherspayteachers.com/Product/Life-Cycle-of-a-Chicken-1210173
 
Click here to preview it on my TPT store :)

Wednesday, February 12, 2014

Valentine's Day Units

I have been busy planning that I have not updated my blog. I just finished a few things on Teachers Pay Teachers.

One of my newer units that I posted recently was There Was an Old Lady Who Swallowed a Rose by Lucille Colandro unit. I am excited to use this book again as part of my listening center and using the pack in my centers.

During snack (which is before centers) I will introduce the story to my class. They will work on their prediction for the story.


After my students listen to the story, they will sequence the events. In my word work center, students will write the words in alphabetical order then read and write the room.


 In my writing center, students will work on their version of the story. We really enjoy making a class book for each story. We like to think of different theme related things the old lady could swallow.

Depending on the day I may review comprehension during reading groups or during my whole group literacy instruction block. Below is one of two comprehension pages.

http://www.teacherspayteachers.com/Product/There-Was-An-Old-Lady-Who-Swallowed-A-Rose-1067543


Check out the pack by clicking on the picture. Enjoy :)

Sunday, January 5, 2014

Chinese New Year

My school resumes Monday from Winter Break.  I took the last week of it to get myself organized and ready for all the upcoming holidays I will include in my lessons. I just finished my Chinese New Year pack. Its is printed, cut out, and ready for laminating.

The pack includes a Chinese New Year poster with character traits of a horse person and the years of the horse. There is a coloring page to go along with it too. My students will do the coloring page during snack. It is a nice time to put on our "thinking music" (Mozart), eat, and color.

In addition, there are math and literacy themed printables (Chinese New Year Word Work, Alphabetical Order, Read and Write the Room, addition, and graphing). We will be using these in our Daily 5/Center time and during Math time. During our Social Studies/Science block, I will introduce the topic with my poster and KWL chart.

Click on the picture below to check it out :)


Teachers Pay Teachers